Opening Review - 2022.08.24 Tygem 1D vs. 1D
27 Aug 2022 reviewToday we’re going to try something new for this blog: a game review! I’ve written up a little introduction for this new category here.
This review will reference evaluations via KataGo. Some less important positions for the discussion might have evaluations with as few as 10k playouts, but generally most positions that are discussed in detail will have evaluations based on >20k playouts.
This will be a review of the opening only. I could continue onto the middlegame, and there are plenty of interesting things to say about it, but then the post would be extremely long given the level of detail I tend to go into, and the opening alone was already plenty taxing.
Full game and background
Below is the record for the full game. The review covers up through move 46. This is a ranked Tygem match between two 1-dan players. The game is played under Japanese/Korean rules with no handicap. I am playing White; the result is W+R.
I’ve chosen this game because I adopted an opening strategy that I don’t often take, so I found it instructive to work out how to execute the plan in practice. It was a relatively balanced game (for games at this rank) without either side taking a decisive advantage for most of the game. Such games are also nice review material because in close games you need to play closer to optimal consistently throughout the game (though, again, we’ll only cover the opening here). There are things to learn from more imbalanced games too (e.g. how to safely close out games you’re winning, or complicate things in games you’re losing). But for practising general, consistent quality of play, a close game offers many teachable moments.
Just a heads up: in this review I intersperse what I was thinking during the actual game together with the conclusions I drew during the postgame review. Hopefully it will be clear which is which from the context. I am hoping it will be helpful to hear why I played as I did and then to see where the AI differs in its assessment.
The Review
The first thing that is unusual (for me) in this game is that I opted to tenuki when Black approached the bottom left corner. Of course, this is not uncommon overall, especially in the modern era of AI analysis; in another person’s game it wouldn’t be a point I would dwell on. It’s just uncommon for me to play this way. Normally I prefer to stick to moves I understand pretty well, and to be perfectly frank my understanding of the 4-4 low approach after tenuki is far from complete. But in this game I just had the sudden urge to play the tenuki - after all, I’ve got the top left corner and an opposing 3-4 point, and my head knows that tenuki from a 4-4 low approach is viable (even if I don’t understand it in my heart), so how badly can this possibly go?
I wasn’t quite expecting the 1-space jump along the side from Black, but I figured that this wouldn’t significantly change the outcome of the 3-3 attachment, and I didn’t think there was any particularly crazy jōseki Black can attempt from such a low position this early, so I opted for the typical jōseki here. I figured this is probably a minor loss for Black but nothing to write home about; in the end Black settles very solidly, while White gets what I consider a slightly more active position on the side with good (but not complete) progress toward settling. Move 12 is an example of a principle I discussed in my post on extensions and I was gratified to see that the principle held up in the post-game AI review, though it’s an extremely minor difference at +0.08 points for the three-space extension over the two-space extension.
I was now expecting Black to double approach the bottom left. I knew in my head that this would be an even outcome according to AI (neither player has deviated all that significantly from AI play yet) and was primarily considering which attachment I would play in response to the double low approach.
However, Black instead opted to slide, making me reconsider. (My opponent appeared to have a more classical, less AI-influenced playstyle than mine.) This is a move that, while not particularly dangerous or unusual, is something I’m less well-versed in compared to the double approaches, simply because I know in my head that the double approaches are AI recommended and therefore I’ve devoted specific effort to study them in the past. I’ve never bothered to study the slide specifically, so I had to play by instinct here.
Here I made my second uncharacteristic play this game, which sets the tone for the rest of the opening (and the game overall): I ignored Black once again and invaded the lower right corner. My reasoning at the time went like this:
I’m pretty sure that Black’s last move is a small local loss, but I don’t specifically know what the best local continuation is. I’m considering attaching on top, knight’s move, two-space high extension, and the pincer, most of which are probably reasonable moves, but I have no idea which one is best and if any are optimal.
I also don’t feel great about any of the local responses I’m considering. I feel like if I respond locally, I should expect to either lose sente or give away influence. For instance, if I play the knight’s move, then Black could take the 3-3 point and then I owe Black either an extension toward the side or attaching on top. If I attach on top right away, Black strengthens this direction and I start to erase some opportunities for continuation on the bottom side, which is something I’d prefer to avoid this early on. Losing sente isn’t unexpected given that I’m now a stone behind locally, but it’s early enough that I want better compensation for it.
I happen to know that Black’s slide doesn’t really pressure my 4-4 stone that well, as part of my general understanding of the 4-4 low approach slide. Knowing how AI likes to play, and given that Black’s last move isn’t putting that much pressure on me (it’s not a double approach or attachment), invading the 3-3 point is likely to be close to optimal here. I have no concrete rationale for this other than being used to AI analysis, but I’m confident that this is at minimum a viable move. As a bonus, I’m quite well versed in 3-3 invasion jōseki, so I’m comfortable that I’ll get out of the invasion without taking a loss.
If I invade the 3-3, the most likely outcome is that Black gives me the corner in exchange for sente, so Black will play first in the lower left. Drawing on the same principles as in my article on tenuki in 3-4 pincer jōseki, I don’t think Black can cleanly subjugate my 4-4 stone even with an extra move. The only reasonable options here are to pincer, which leaves me the option to escape to the center, or press from above, which gives me a clean escape to the left side, or take the 3-3 point, which cleans up a lot of the associated aji but is submissive and still leaves both escape routes. So I don’t think I’m risking any severe punishment, and I should be able to construct a reasonable (i.e. not significantly losing, which is honestly all I care about) game plan on the fly since I have some theoretical understanding of a similar type of position.
Fortunately, my instincts proved reasonable according to KataGo, and the 3-3 invasion is indeed a decent response to the slide. What’s interesting to me is that KataGo’s preferred option is B, the large knight’s move, by about +0.35 points. I don’t fully understand the rationale here, but my best guess based on the sample playout shown is that the large knight’s move is the best local continuation at progressing toward settling without needing to invest another stone or strengthening Black locally. The small knight’s move can’t settle without investing an extra stone anyway, so there is no point going with a narrow extension; this is in accordance with the principle that weak groups should extend far enough to claim enough space to settle. The large knight’s move also doesn’t force a local response out of Black (unlike, say, attaching on top), and following the principle “play away from strength”, Black should not bother to spend an extra move here either as now it has access to the 3-3 point for guaranteed life. So this manages to progress toward settling without damaging White’s prospects on the bottom side. It’s an interesting possibility that I would not have naturally thought of. Still, I am overall satisfied with the 3-3 invasion as an alternative answer.
I was not expecting the hane at R2, but I did happen to know that jōseki pretty well, and that connecting at R3 was a mistake, though not the precise numerical value. After White concludes the jōseki with the tiger’s mouth, Black’s outcome is inferior to the 3-3 invasion, knight’s move variation. White’s corner is more conclusively alive, the tiger’s mouth radiates strength on the right side that neutralizes the effect of Black’s strong group in the top right, and the hane-connect exchange doesn’t strengthen Black’s group enough to compensate for the fact that White’s corner is also stronger. The added White strength makes Black’s group weaker, as it no longer gets access to certain sente moves against the corner, and it is well-known that this Black group is a potential target for attack in other lines of the 3-3 invasion. So I came out of the jōseki pretty satisfied overall, and starting to consider possible continuations on the bottom side where I could look to exploit the potential weakness of Black’s wall. KataGo agrees that the outcome favors White, though I did not expect a number like W+7.3 - I was thinking that the advantage was more modest.
But of course, Black does emerge with sente, and comes around to make the third uncontested move in the bottom left. Here my first complicated positional evaluation task begins, ultimately (spoilers!) leading to my first significant mistake.
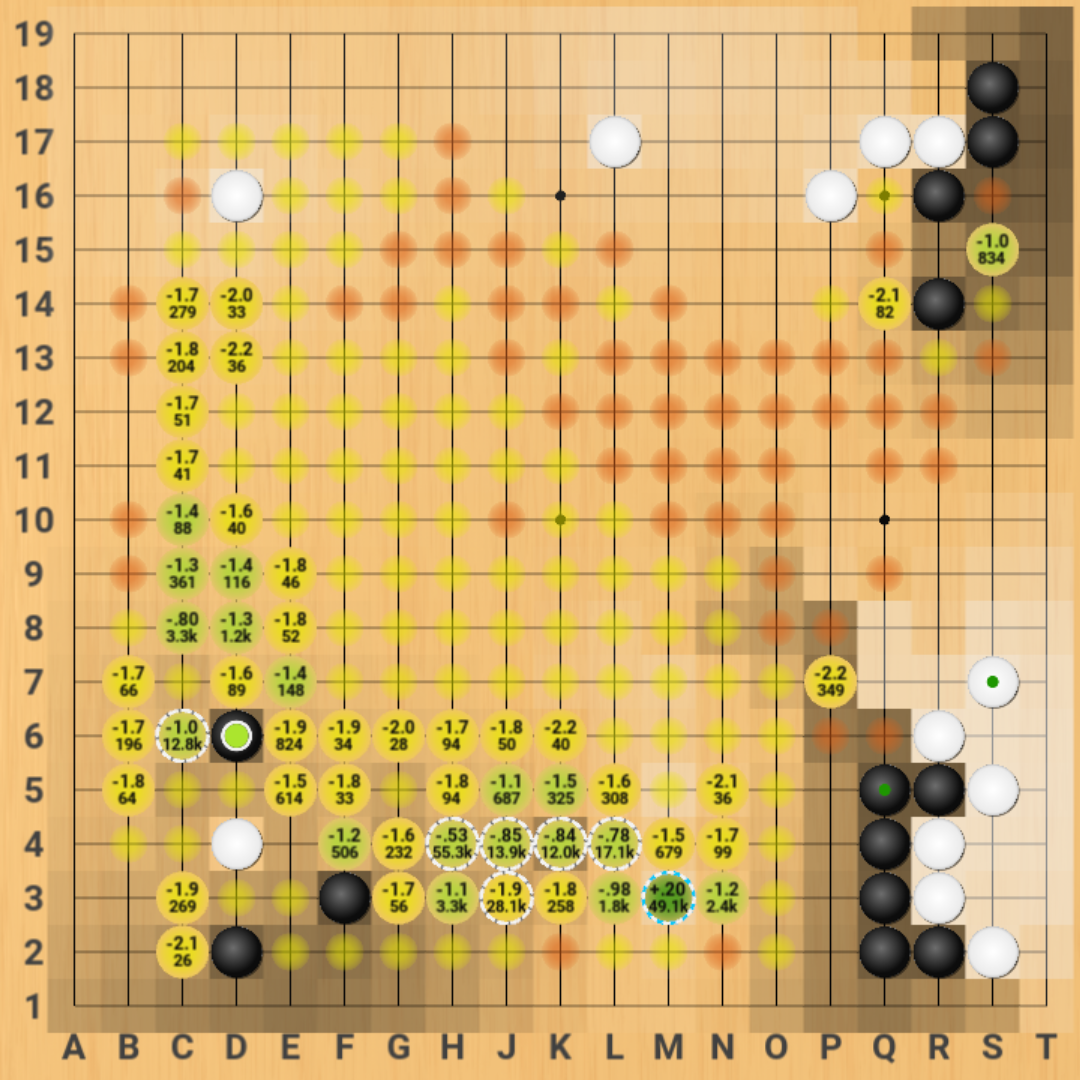
I think it’s interesting to view KataGo’s view of the position. I was surprised when I got to this position in the review, as I did not expect the position to be quite so sharp this early in the game. In most games there are many viable moves at move 26, but here KataGo says that there’s a pretty clear-cut answer. As such, this seems a good point to pause for a careful direction-of-play analysis.
First, let’s take a brief glance at the overall position. White’s stones overall are mostly fairly safe. The bottom right corner is alive. The top right group probably needs one more move to secure life, but it’s not under much pressure at the moment so it can easily be left alone. The top left corner is undeveloped, but it’s a 4-4 point so there’s nothing catastrophic that can happen to it if Black approaches (even twice), so while we can’t call it a strong group there’s not much weakness there either. The stone in the bottom left is obviously weak, but that’s by design so it’s ok.
As for Black, its group in the top right is alive. The wall in the bottom right is potentially a weak group as discussed previously, and White wants to exploit this fact somehow, at some point. The bottom left corner is fairly strong.
As an additional point of consideration, there remains some aji associated to the D4 stone, as it is not completely subjugated. Whether it’s a good idea to move it right this moment is a different story. What’s important here is that Black really wants to avoid capturing this stone in a small way (like E5) if at all possible. To do so would be overconcentrated, and there remains enough aji in the corner that Black is still subject to reduction. Ideally Black would like to capture this stone indirectly, basically for free as a consequence of stones placed elsewhere as part of another engagement. White, on the other hand, still needs to extract some value from this stone for its two tenukis to really constitute a gain over the local loss sustained here.
Therefore White has an important question on its hands that will probably drive the central narrative of the approaching middlegame: how can White profit from pressuring Black’s weakness on the bottom right while making sure that it can still extract value out of its stone in the lower right?
With this in mind, let’s examine some of KataGo’s continuations and get an understanding of its rationale.
First, the recommended move (A) is to pressure Black’s lower right from the third line, forcing it to secure an exit route to the center. White establishes a presence in the bottom side, neutralizing Black’s potential while taking sente; it then gets the opportunity to come back to H4 and threaten follow-ups in the lower left. The key observation here appears to be that Black ultimately needs two moves to fully subjugate the White stone in the bottom left, so there is no actual worry that White will lose the opportunity to exploit its aji (in this variation, by swooping under from the left side). Therefore White should pressure Black’s wall more directly and extract as much profit as it can before the opportunity disappears. Essentially, the lower right is urgent, because Black can settle the situation if given a single move, but the lower left is not because Black needs two moves.
The next best move, B, threatens the aji in the lower left more directly, and basically asks Black to finish subjugating the White stone in a way that is small. If Black agrees, then White can extend back toward the bottom right and return to pressuring Black’s weak group, and once again, the aji in the corner is not completely dealt with. It’s worth noting that this sequence and the previous, “optimal” one both get to play H4 and M3, just in opposite orders; the difference appears to be that in the optimal sequence, White gets an opportunity to further pressure Black. Black also has other options after B, such as attempting to settle the bottom right immediately, in which case White has several options now to exploit the bottom left stone in a big way. In the sequence shown, White settles in the center and takes sente while Black connects under in the corner. For having had a 3-to-1 advantage in the area, Black’s corner is surprisingly small, so this is acceptable.
The remaining moves which are a bit shy of B in terms of score appear to be pointing out that H4 is the best move in terms of pressuring Black to address White’s aji in the bottom left, while M3 is the best move to pressure the bottom right. The threat of F4 makes it hard for Black to address the aji after H4 without playing directly against the D4 stone, and M3 is the appropriate distance to pincer the bottom right even from a classical perspective. The other moves in the area live in a limbo where it falls short in one of these two aspects, generally both.
As it turns out, in the actual game I picked one of the worst among similar choices in the area.
Move 26 has the same problems as described in the suboptimal choices above. It has the further problem that it is on the third line, and White should fully expect Black to extend from the lower right and pincer, but in that case it is preferable that White be one line higher. White cannot expect to settle on the side and therefore is better off being a step closer to the center. This is an important principle of invading into strength and something I should have considered.
My rationale for J3 was that I wanted it to achieve a similar effect to H4: my guess was that Black would address the aji in the bottom left directly and leave it overconcentrated. But again, the urgent direction here was the bottom right as Black can take care of the weakness here with a single move, and Black identified this well.
That said, now I was committed and I decided to activate the D4 stone right away. Simply jumping out would not be sufficient as White would then form a floating group, allowing Black to attack and surround the D4 stone in sente, and it is not harder for White to lean against the bottom right group as it was recently strengthened. Again, it is important for this game that White prevents Black from taking the D4 stone for free. Fortunately this turns out to be the correct decision. Overall I was pretty happy to see Black connect under at C4, as I judged that this is not sufficient compensation locally in a corner where Black got 2 free moves.
My next mistake came a few moves later, when I attached on top at L4. Here I was expecting the hane-draw back-connect exchange, but neglected to consider if Black extends upward. This outcome isn’t terrible, but I was also not in a position to see it due to a major misconception I had. I was playing under the assumption that the D4 stone is not large and not worth connecting to. After all, it is only a single stone, and my group is still a ways from life while being beset on two sides by strong groups, so I don’t know that I can spare the time to connect to what doesn’t seem like a valuable stone. For this reason I had also not bothered to read out the aji against the corner; my mind was too biased toward treating it lightly.
KataGo’s analysis here is different. The D4 stone is still important for two reasons. First, the aji in the corner is not finished: C5 and C3 are locally sente and thus D4 still has a role to play in reducing the value of the corner. White can in fact activate this aji right away to overconcentrate Black’s corner while providing additional sente moves to aid White’s center when it needs to settle. Second, White is weak enough locally that pushing through at E4 is sente against White’s group. This means that if White doesn’t connect the D4 stone soon, then Black will have the opportunity to take it and erase the corner aji in sente. This means that White doesn’t quite have the time right now to be performing the L4-hane exchange. It doesn’t fundamentally solve White’s issue with settling - in fact, by strengthening Black on the right, it weakens White.
I seem to rely on the L4 exchange more than I ought to, mainly because I know what to expect. But that is problematic, because if I think through the outcomes carefully then I come to the conclusion that this move usually strengthens the opponent’s stones more than mine, especially if the opponent can afford to extend instead of connecting. Moreover it is often (as is the case here) a loss in terms of territory, so I should reserve it for more specific situations. This was not an appropriate situation for the L4-hane exchange because I have to settle the entire group, not merely the J3 stone. In the end, however, Black actually opted to extend instead of hane, and I felt ok with that exchange overall during the game as I don’t mind Black playing submissively when I am the one who’s locally weak.
H5 was a mistake with similar origins. Here I was still misjudging the value of D4, and thinking that it doesn’t really matter if Black captures it, so I am better off protecting the G4 cutting point right away. But this is bad not only because Black will happily take D4 and clean up the corner aji if it can do it in sente. Moreover, now that H5 is in place this also manages to overconcentrate White. Better options here include pressing Black further from above at M4, strengthening White’s center and also taking away the turn from Black, and connecting at E4, allowing the cut and starting a fight. These are viable because the exchange of L4 for M3 is a good one for White when a fight breaks out, allowing White to viably settle two groups simultaneously.
However, I don’t particularly regret my decision to stay connected here overall. At this point in the game, I was confident that so far I had managed to come out of the opening not necessarily ahead (I certainly didn’t think I was a full +4.9 points ahead as KataGo says), but at least with a reasonable outcome and within striking distance. Staying connected would avoid a fight on two fronts within the enemy’s sphere of influence, and I had already gained in the bottom right while also limiting Black’s profit in the bottom left to a reasonable degree. So while I wasn’t sure if staying connected would be a loss (I realized it was a few moves later after Black pushed through), I was fairly confident that it would not be such a loss as to overcome White’s gains and put White firmly behind. My feeling was that there was a good chance that this game would go all the way to counting, since no substantially weak groups were forming and significant one-sided local advantages seemed unlikely to form, so staying within striking distance of komi seemed an acceptable outcome and staying connected felt sufficient for that.
In any case, Black took sente again and approached the final corner, beginning the final phase of the opening.
Here I made another direction of play mistake: the pincer is not appropriate at this juncture.
My rationale behind the pincer was that I expected (as KataGo suggests) Black to take the corner, and I would take the outside and neutralize Black’s influence from the bottom left corner. But this is failing to adhere to basic direction of play. The bottom left corner is extremely strong and White has no business putting stones in that direction. There is little development potential for White here as White gets absolutely no sente moves in this area.
My main worry was that the other options, such as drawing back or the kick, were most likely to result in Black strengthening the group here, and then I would need to consider an invasion of the left side. But KataGo suggests that this is not something to be afraid of, specifically for the kick. Black cannot secure the left side in a single move after the kick, and in addition White has forcing moves to build influence on the bottom side since Black responded submissively to L4. Taking all these into account, White doesn’t need to fear strengthening Black via the kick, as it can freely invade the side anyway.
There are two important points to note here, which I failed to in the actual game. First, I failed to notice that White’s bottom side group, now being quite strong, was a major source of influence, so I could took toward playing for a moyo in the center (as KataGo recommends in the kick variation). I was still in the mindset of thinking about this group as potentially weak, and moreover I was still in an opening-oriented mindset and focusing on sides and corners. I think there are two takeaways here. One, when the strength/weakness designation of my group changes, I need to re-evaluate this designation more quickly, and re-evaluate the consequent impact on the global position more quickly as well. Two, I need to be faster at the transition from an opening-oriented mindset to a middlegame-oriented one, which ultimately means I need to be thinking a few moves farther ahead in time. Here, by being too focused on opening goals like side and corner territory, I overly neglected the possibility of making profit in the center, leading to overlooking the kick and its immediate followups.
Second, I failed to recognize that all of White’s groups are fairly secure, and thus I should have been not be afraid to strengthen Black to begin with. Since I would have had only one weak group to take care of post-invasion, I should have been confident in my ability to emerge from an invasion without taking serious damage. Instead, I erred too strongly on my habitual side of not jumping into opposing strength, which is another reason why I dismissed the kick prematurely.
This misconception would back back to haunt me again. I did not expect the Black jump, though that wasn’t a problem; I knew that this move is a local loss. The problem comes after the slide: I should have thought through why the jump is a local loss. If I had, then I would again have realized that as White is generally strong around the board, it is not difficult for me to deal with an attack on the pincer stone. In addition, because Black played the one-space jump, it has to be a little selective on how it chooses to attack the pincer. Therefore the left side is not that urgent and I can afford to take the big corner point. I also failed to take into account that taking the 3-3 point as Black weakens the entire top side overall, and begins to expose the weaknesses of the top right (such as N17), so it’s very close to (if not actually) sente for Black. This also fully settles Black’s group on the top left, making a subsequent attack on White’s left group more powerful.
For move 46 I considered blocking Black off, which is the locally optimal move, but it seemed obvious that Black would then play the top side, which KataGo confirms is a valid direction of play. In particular I was concerned with what happens if Black splits my two groups, as I would have to settle separately (an option KataGo confirms is viable, though it’s not shown here). But again, I think I failed to account for the strength of my stones here. After the two-space extension, the White group on the left is fairly safe; it is in the midst of Black strength, but it has room to slide to B7. So after Black splits the top and I settle one of the two top groups, I am again working with essentially only one weak group. Taking into account that I should have sente moves against Black’s splitting attack, and that I have pretty good support in the center, I should have been willing to at least consider the fight rather than immediately opt for a guaranteed local loss. Moreover, there are enough vulnerabilities in White’s formation that Black can profit without starting a fight, as we see in the sample AI continuation above.
I was mostly focusing on the potential fighting variation, however, and for me it was fairly difficult to evaluate the fight at the time. In such an event, the board would likely finalize into one where lots of little groups settle separately and nobody has big chunks of territory anywhere; I find these types of games relatively hard to count. By claiming the top side I could instead give myself a fairly sizeable chunk of territory that I can evaluate easily, and I could instead try to approach the middlegame with a clearer understanding of the win conditions. I think this decision was strategically reasonable at the time, but to improve I think need to develop enough strength so that I can play a bit more tight in these situations rather than play while absorbing a loss that I’m fully aware of.
We conclude our opening review at move 46, right before Black provokes a fight to signal the start of the middlegame. There is quite a lot about the middlegame to say as well, with the lead changing multiple times and the game never really getting out of hand for either side until Black misplays toward the end, but this review is quite long enough already.
Conclusion
To conclude, let’s summarize the actionable ideas I’ve extracted from this review.
-
Tenuki is pretty viable in the opening, and honestly pretty fun! I should consider it more often in situations where I don’t know the local response but I’m not immediately under pressure to respond locally.
-
The principle of extending far enough to secure eyespace applies in more places than I was aware of.
-
If one enemy group can fix its weakness with a single move and another group needs two, this pushes attacking the first one up the priority list. I’ve got some time to spare before attacking the second group.
-
I don’t pressure the wall after the 3-3 invasion as often as I should in most games.
-
I should think carefully about the surroundings before entering my opponent’s sphere of influence on the 3rd line. I should consider if I can realistically expect to settle on the side or if I’m more likely to need to run to the center.
-
I should check if the opponent can make me overconcentrated via their sente exchanges.
-
Against a one-space approach from the side on the third line, reconsider before attaching on top. The hane-draw back exchange often favors the opponent locally, so I need a good reason to play it.
-
Aji has concrete value, I need to read it out before I decide on whether I allow it to disappear.
-
Group strength and weakness changes dynamically. I should be quick to re-evaluate, and be quick to factor this into my positional evaluation as well.
-
It is worth it to start thinking about the transition from opening to middlegame early. Look ahead!
-
It’s not that dangerous to play with a single weak group. I need to make a conscious effort to count how many I’m really working with.
-
Backing off to reduce the game to an understandable position isn’t inherently a bad idea, but I should try harder to understand the tighter but riskier plays.